After replacing the purge valve in your vehicle, it’s crucial to follow specific steps to ensure everything runs smoothly. “What to do after replacing purge valve” is a common question among car owners.
In this comprehensive guide, we’ll outline the necessary procedures and maintenance tips to optimize your vehicle’s performance post-replacement. From clearing error codes to testing for functionality, we’ll cover it all. Additionally, we’ll provide valuable insights into proper maintenance techniques to prevent future issues.
By following these post-replacement protocols, you’ll ensure that your vehicle’s emission control system remains efficient and compliant. Stay tuned to learn the essential steps for maintaining your vehicle after a purge valve replacement.
Understanding the Purpose of a Purge Valve
A purge valve is a vital component of your vehicle’s emission control system. Its primary function is to regulate the flow of fuel vapors from the fuel tank to the engine intake manifold.
By controlling the vapor flow, the purge valve helps prevent harmful emissions from being released into the atmosphere. During certain engine operating conditions, such as when the engine is warm and running, the purge valve opens to allow the fuel vapors to be drawn into the engine and burned along with the air-fuel mixture. This process not only reduces emissions but also improves fuel efficiency.
Essentially, the purge valve plays a crucial role in maintaining the environmental friendliness and performance of your vehicle. Understanding its function is essential for proper vehicle maintenance and emission compliance.
What To Do After Replacing Purge Valve
Congratulations on successfully replacing your vehicle’s purge valve! Now that this crucial component of your emissions system has been swapped out, it’s essential to follow a series of steps to ensure everything is functioning optimally.
In this guide, we’ll walk you through exactly what to do after replacing purge valve, covering important post-replacement procedures to keep your vehicle running smoothly and efficiently.
Visual Inspection
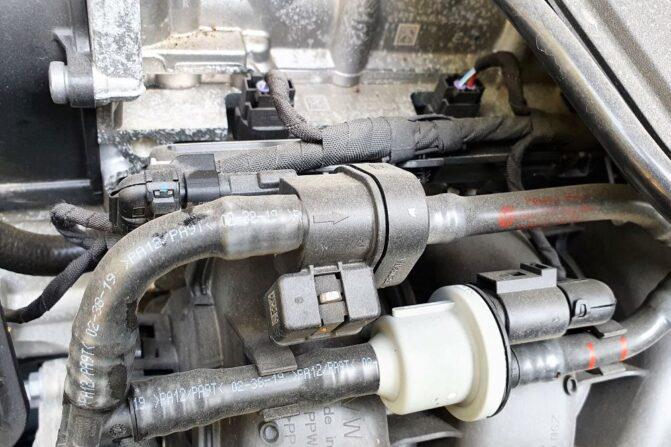
The first step after replacing the purge valve is to conduct a thorough visual inspection. Check the new purge valve and surrounding components for any signs of damage or irregularities. Look for loose connections, damaged hoses, or leaks. Ensure everything is properly secured and aligned.
Leak Check
Even a small leak in the emissions system can lead to performance issues and emissions problems. After the visual inspection, it’s crucial to perform a leak check.
Use a handheld smoke machine or a solution of soapy water to detect any leaks around the purge valve and its connections. Repair any leaks promptly to prevent further issues.
Functionality Test
Next, it’s time to test the functionality of the new purge valve. Start the engine and listen for any unusual sounds coming from the emissions system. Monitor the vehicle’s performance, especially during acceleration and deceleration. Ensure that the purge valve opens and closes smoothly as needed.
Resetting the OBD System
After replacing the purge valve, it’s essential to reset the onboard diagnostics (OBD) system. This allows the vehicle’s computer to relearn the new component and adjust its parameters accordingly.
Use a scan tool to clear any stored error codes and reset the system. Alternatively, you can disconnect the battery for a few minutes to reset the OBD system.
Test Drive
Once the visual inspection, leak check, functionality test, and OBD reset are complete, take your vehicle for a test drive. Pay close attention to how it performs during various driving conditions.
Keep an eye out for any abnormal vibrations, sounds, or warning lights. A test drive allows you to ensure that the purge valve replacement has been successful and that your vehicle is operating as it should.
Monitoring
After the test drive, continue to monitor your vehicle’s performance over the next few days. Keep an eye on the dashboard for any recurring warning lights or error codes. If you notice any issues, take action immediately to prevent further damage or challenges in the future.
By following these post-replacement procedures, you can ensure that your vehicle continues to run smoothly and efficiently. From visual inspections to functionality tests, taking care of your emissions system is essential for both vehicle performance and environmental protection.
Signs Your Purge Valve Needs Replacement
Your vehicle’s purge valve plays a crucial role in its emission control system, but like any part, it can wear out over time. Knowing when to replace your purge valve is essential for maintaining optimal performance. Here are some signs that indicate it’s time for a purge valve replacement:
- Check Engine Light: If your vehicle’s check engine light illuminates and the diagnostic code indicates a purge valve-related issue, it’s a clear sign that replacement may be necessary.
- Rough Idling: A faulty purge valve can cause rough idling or stalling when the vehicle is at a standstill. If you notice your engine struggling to maintain a smooth idle, it could be a sign of purge valve failure.
- Decreased Fuel Efficiency: A malfunctioning purge valve can disrupt the air-fuel mixture, leading to decreased fuel efficiency. If you find yourself making more frequent trips to the gas station for refueling, it may be time to replace the purge valve.
- Strong Gasoline Odor: A leaking purge valve can cause gasoline vapors to escape from the fuel system, resulting in a strong odor of gasoline inside or outside the vehicle.
- Failed Emissions Test: If your vehicle fails an emissions test due to high levels of hydrocarbon emissions, it could indicate a problem with the purge valve or the entire emission control system.
If you experience any of these signs, it’s advisable to have your purge valve inspected by a qualified mechanic and replaced if necessary. Addressing purge valve issues promptly can prevent further damage to your vehicle’s emission control system and ensure compliance with environmental regulations
Maintaining Your Purge Valve for Longevity
Regular maintenance is key to maximizing the lifespan of your recently installed purge valve. By adhering to a routine maintenance schedule, you can prevent premature wear and ensure optimal performance.
Start by inspecting the purge valve and its connections regularly for any signs of leaks or damage. Additionally, keep an eye on the condition of the hoses and fittings associated with the purge valve, as they play a crucial role in the emission control system.
If you notice any issues or abnormalities, address them promptly to prevent further damage. Performing routine maintenance checks will not only prolong the life of your purge valve but also contribute to the overall health and efficiency of your vehicle’s emission control system.
FAQs on What To Do After Replacing Purge Valve
Can I drive my car immediately after replacing the purge valve?
Yes, but it’s recommended to perform a test drive to ensure everything is working correctly. Monitor for any abnormal noises or performance issues during the drive.
RECOMMENDED POST How Long Can You Drive With A Bad Purge Valve
How often should I inspect the purge valve after replacement?
It’s a good idea to inspect the purge valve regularly, especially during routine maintenance checks. Look for signs of wear, damage, or leaks that may require attention.
What should I do if I notice a check engine light after replacing the purge valve?
Don’t panic! Check engine lights can sometimes appear after component replacement. Use a scan tool to diagnose the issue and address it accordingly.
How long does a purge valve typically last after replacement?
The lifespan of a purge valve can vary depending on usage and environmental factors. With proper maintenance, a new purge valve should last for a considerable amount of time.
Will replacing the purge valve improve fuel efficiency?
Yes, replacing a faulty purge valve can improve fuel efficiency by ensuring that fuel vapors are properly routed to the engine for combustion. This helps optimize the air-fuel mixture and reduce wasted fuel.
Conclusion on What To Do After Replacing Purge Valve
In conclusion, knowing what to do after replacing purge valve is essential for maintaining your vehicle’s emissions system and overall performance. By following the steps outlined in this guide, including post-replacement inspection, functionality testing, OBD system reset, and regular maintenance, you can ensure that your vehicle continues to run smoothly and efficiently.
Remember, a well-maintained emissions system not only benefits your vehicle but also contributes to a cleaner environment. So, don’t overlook the importance of post-replacement procedures and stay proactive in caring for your vehicle.
With these simple steps, you can enjoy peace of mind knowing that your purge valve replacement has been successful and your vehicle is in good hands.
RECOMMENDED POST Can a Bad Belt Tensioner Cause Rough Idle
RECOMMENDED POST Transmission Not Shifting Out of First Gear
RECOMMENDED POST What To Do After Replacing MAP Sensor